Downloading
Data Connectors from the Resource Hub.
Data
Connector Names and Paths
See Also: Server Admin
Configuration, JavaScript
API, Form Editor
Introduction
Data Connectors allow interaction with a specific web service that is typically a non-UI based REST service.
Using Data Connector’s provides a clear programmable
JavaScript interface that abstracts the both the communication and data objects
with the service. Data Connectors are a separate entity, represented by the ![]() icon. A new Data Connector provides an initial
template that can be customised with specific methods and variables that
reflect the purpose of the service call. A Data Connector is reusable across
any number of Forms throughout the application using a customised JavaScript
implementation using a familiar JavaScript API function and object notation.
Data Connectors are written using the server side JavaScript API and are easily
accessed using the Verj.io Data Connectors API.
icon. A new Data Connector provides an initial
template that can be customised with specific methods and variables that
reflect the purpose of the service call. A Data Connector is reusable across
any number of Forms throughout the application using a customised JavaScript
implementation using a familiar JavaScript API function and object notation.
Data Connectors are written using the server side JavaScript API and are easily
accessed using the Verj.io Data Connectors API.
Data Connectors are added to a Form’s or Component’s Data Connectors View. They can then be accessed in any of the Forms or Components server events, including server events from their Pages and Controls, using the Verj.io JavaScript API.
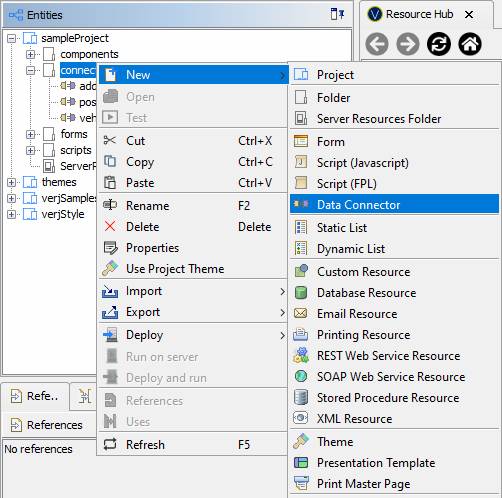
Creating Data Connectors
Data Connectors are created by selecting File > New > Data Connector from the main menu or right clicking the Entity Tree and selecting New > Data Connector.
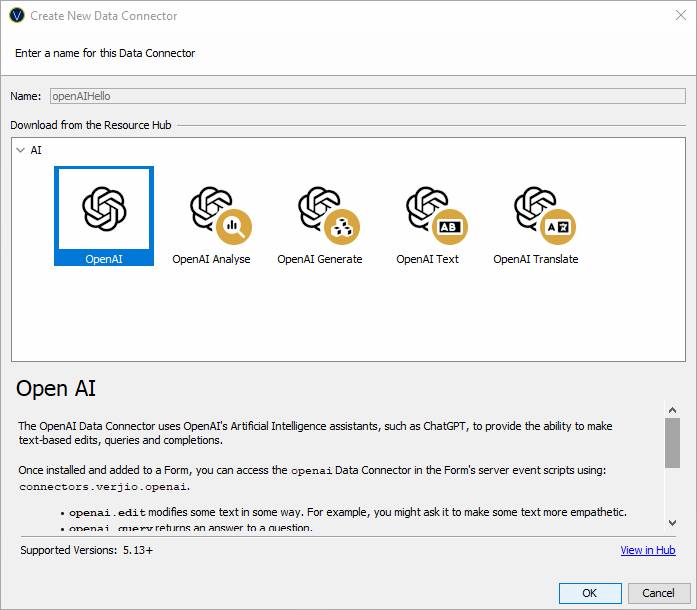
The Data Connector Dialog can either download a Data Connector from the Resource Hub or create a new one.
Name: Name of the Data Connector.
Download from the Resource Hub: Select one of the ready made Verj.io Data Connectors. By selecting a Data Connector, a preview of the Connector will be shown below the selection panel with a description that describes the Data Connector and its implementation. The preview also show the Verj.io server Supported Versions.
The View in Hub hyperlink launches an external
webpage in a web browser to the Verj.io Resource Hub. This webpage contains
additional information, including configuration and usage instructions, for the
selected Data Connector.
New Data Connectors
When a new Data Connector is created an initial template is automatically created, consisting of the following:
- A JavaScript object representation that is added to the Verj.io JavaScript API for referencing throughout the application’s JavaScript events, based on the Data Connectors name.
- The Data Connector properties such as API keys, target URL and other specific properties that are configured using the Server Administration Application.
- JavaScript functions required to use the Connector API. An example function is automatically generated when an empty Data Connector is created.
New Data Connectors are added to the connectors.dataconnectors JavaScript API namespace, for example connectors.dataconnectors.myDataConnector.
Data Connector
Template
Creating a new data Connector named vehicleEnquiryService generates the following JavaScript stub:
importPackage(com.ebasetech.xi.api);
importPackage(com.ebasetech.xi.services);
/*
* A Data Connector to
interact with a target REST Service.
*
* Usage:
* 1. Create a Data Connector Configuration for vehicleEnquiryService
in the target Server's Administration Application.
* Define both an 'apikey' and a 'baseUri' property.
* 2. Create functions in this Data Connector to perform actions
against the target REST Service.
* 3. Add the Data Connector to the Resources View of Entities that need to connect to the target REST Service.
* 4. Call your created functions in the server-side event script of
those entites.
* For example: connectors.dataconnectors.vehicleEnquiryService.myFunction();
*
* Detailed Data Connector
configuration examples be found in the Resource Hub's
Tutorials section at https://hub.verj.io.
*/
// Add this Data Connector to the Verj.io JavaScript API
if (!connectors.dataconnectors.vehicleEnquiryService) {
connectors.dataconnectors.vehicleEnquiryService
= new vehicleEnquiryService();
}
/**
* The Data Connector
definition.
*/
function vehicleEnquiryService() {
// Load this Data
Connector's Data Connector Configuration.
const
__config = connectors.getConfig("vehicleEnquiryService");
// Set the base URL
for the target RESTful Web Service from the
Connector's Data Connector Configuration.
const
__baseUri = __config.baseUri;
// Set the API key for
the target RESTful Web Service from the Connector's
Data Connector Configuration.
var __key = __config.apikey;
// Configure
this Data Connector as RESTful DataConnector,
passing in the base URL for the target RESTful Web
Service.
const
restDataConnector = connectors.createRESTDataConnector(__baseUri);
/**
* Example function.
*
* Performs a GET on an endpoint of the RESTful Web Service.
*
* Example use:
* var result = connectors.dataconnectors.vehicleEnquiryService.myFunction();
*
* @return {object} API Response object
*/
this.myFunction
= function() {
// Construct a
URL to the endpoint to call.
const uri = restDataConnector.createUri('theEndpoint');
// Perform a GET request on that endpoint.
return restDataConnector.get(uri);
}
};
The function myFunction
should be replaced with something meaningful to the service purpose.
Example Data
Connector Script
This example Data Connector interacts with a vehicle
information web service to get its details based on its registration number.
/**
* Vehicle Enquiry Service
(VES)
*/
function vehicleEnquiryService() {
// Load this Data Connector's Data Connector Configuration.
const
__config = connectors.getConfig("vehicleEnquiryService");
// Set the base URL
for the target RESTful Web Service from the
Connector's Data Connector Configuration.
const
__baseUri = __config.baseUri;
// Set the API key
for the target RESTful Web Service from the
Connector's Data Connector Configuration.
var __key = __config.apikey;
// Configure
this Data Connector as RESTful DataConnector,
passing in the base URL for the target RESTful Web
Service.
const
restDataConnector = connectors.createRESTDataConnector(__baseUri);
// This REST service
requires the API key to be added as an ‘x-api-key’
header.
restDataConnector.setDefaultHeader("x-api-key", __key);
/**
* Vehicle Enquiry function.
*
* Performs a POST to the Government Vehicle
Enquiry Service
*
* Example use:
* var resp
= connectors.dataconnectors.vehicleEnquiryService.vehicleEnquiry("TE57
VRN");
*
* @return {object} API Response object
*/
this.vehicleEnquiry = function(registrationNumber)
{
var req
= {"registrationNumber": registrationNumber};
// Construct a
URL to the endpoint to call.
const uri = restDataConnector.createUri('vehicles');
// Perform a GET request on that endpoint.
return restDataConnector.post(uri, req);
}
};
Downloading Data
Connectors from the Resource Hub
When a Data Connector is downloaded from the Resource Hub it is added to the connectors.verjio JavaScript API namespace.
Before a downloaded Data Connector can be used an API key (or other credentials) for the target web service typically need to be configured, in the Data Connectors section of the Server Administration Application. The Verj.io Resource Hub contains instructions about how to configure each available Data Connector.
Using Data
Connectors
Data Connectors are added to Data Connectors View in the Form or Component Editor.
When added, the Form’s and Component’s server side events (including events from its Pages and Controls) can use the Verj.io JavaScript API to interact with those Data Connectors.
For example, add the following to a Button Control’s on-click event to run a vehicle enquiry using the vehicleEnquiryService Data Connector:
// call vehicle enquiry function
var resp = connectors.dataconnectors.vehicleEnquiryService.vehicleEnquiry(fields.registration.value);
//set field values from the response object
fields.taxDueDate.value = resp.taxDueDate;
fields.engineCapacity.value = resp.engineCapacity;
fields.motExpiryDate.value = resp.motExpiryDate;
Data Connectors View
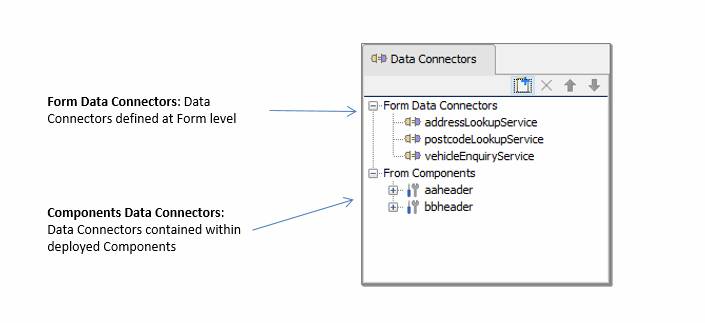
The Data Connectors View contains a list of Data Connectors available to the parent Form, Application Layout, Component, Integration Service or Workflow Process. A Data Connector must be added to this view it is available to server side events via the Verj.io JavaScript API. Data Connectors contained within deployed components are shown under the prefix name for each deployed component. Application Layout Data Connectors are not shown in the Forms Data Connectors view.
Each Data Connector in the view can be:
- Clicked on to display its properties in the Properties View.
- Double-click on a Data Connector to open the corresponding Data Connector editor.
- Hovered over with the mouse to display its path.
A block of Data Connectors can be selected by holding the Shift key and clicking on the Data Connectors. To select multiple non-contiguous Data Connectors hold down the Ctrl key and click on the Data Connectors.
Data Connectors can be added by dragging them from the
Entity Tree view or by clicking the new Data Connector icon ![]() .
Once added, they can be prioritised by using the
.
Once added, they can be prioritised by using the ![]() and
and ![]() icons, which affects the execution order of
the Data Connectors in the entity’s server-side events.
icons, which affects the execution order of
the Data Connectors in the entity’s server-side events.
Data Connectors can be copied and pasted between Forms, Components, Integration Services and Workflow Processes.
Data Connector Names and Paths
The Data Connectors View shows the name of each Data Connector, and its path can be displayed by moving the mouse over the name.
When a new Data Connector is created or downloaded from the Verj.io Resource Hub, the Data Connector’s JavaScript name will be the same as the entities name. However, renaming the Data Connector entity will not refactor the JavaScript name of the Data Connector.
Data Connectors toolbar
The following functions are available. Short cut keys apply only when the Data Connectors View panel is in focus.
|
|
(Ctrl N) |
Add a new Data Connector |
|
|
(Delete) |
Removes the reference to selected Data Connector(s) – note that this does not delete the Data Connector itself. |
|
|
(Up) |
Move the Data Connector execution priority up. |
|
|
(Down) |
Move the Data Connector execution priority down. |
Right click functions
Following functions are available when one or more Data Connectors are selected; shortcut keys shown in parentheses. Short cut keys apply only when the Data Connectors View panel is in focus.
|
Add Data Connector |
(Ctrl N) |
Add a new Data Connector |
|
Move Up |
(Up) |
Move the Data Connector execution priority up. |
|
Move Down |
(Down) |
|
|
Remove Data Connector(s) |
(Delete) |
Removes the reference to selected Data Connector(s) – note that this does not delete the Data Connector itself. |
|
Cut |
(Ctrl X) |
Same as copy, but also deletes selected Data Connectors(s). |
|
Copy |
(Ctrl C) |
Copies selected Data Connectors(s) to the clipboard. |
|
Paste |
(Ctrl V) |
Paste is only enabled when Data Connectors(s) have previously been copied to the clipboard. You can copy/paste Data Connectors between any two Data Connector Views or if the Data Connector does not already exist. You cannot copy and paste a Data Connector into the Form Components |
|
References |
(Alt Ctrl R) |
Displays references to the selected Data Connector in the References Panel |
Properties
Data Connector properties are displayed in the Properties View panel when a Data Connector is selected in the Data Connector View panel.
|
Description |
|
|
Name |
The name of the data connector. |
|
Path |
The path to the data connector. |